
DIY Chalk Paint Cabinet
When we moved into our house several years ago I sourced a lot of different places for furniture – outlet stores, thrift stores, furniture stores, catalogs, Ikea.
I didn’t want our house to have a “furniture store” look. If I liked the look of something and it went with the space I bought it.
A lot of our furniture we’ve acquired over time. I think it’s hard to move into a house and immediately buy every piece of furniture at once – unless you have unlimited budget and a designer on speed dial.
What I did do when we bought our house, is made a list of each room and the types of furniture I potentially wanted for that room.
That way if I saw something in my travels that I thought might work, I could refer to my list and snatch it up.
Thrift Store Cabinet
This cabinet was one of those items that I saw while browsing in a local thrift store.
I’m not typically drawn to mid-century furniture but I really liked the size and the shape of the cabinet. I also liked the price, it was only $25!
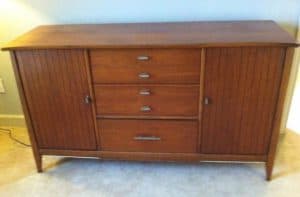
My husband hated this cabinet, not only did he say it was ugly but it weighed a ton! Regardless – we used it for years without doing anything to it.
I couldn’t decide if I wanted to paint it or not. So I used it to store craft items and games for the kids.
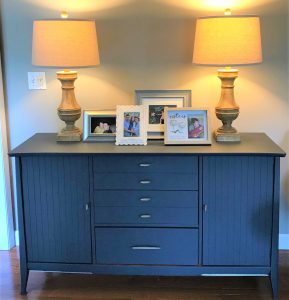
Last spring I decided it was time to refresh this cabinet. I’d been seeing navy everywhere on painted furniture and I really wanted to paint something navy.
Navy Refresh
So I found this fantastic navy (cannot recommend it enough) and got to work painting my cabinet.
Cabinet Refinishing Steps
- Move your cabinet to a well ventilated area and cover the floor with plastic or paper to catch any spills.
- Gather all of your supplies – see below.
- Remove all doors, drawers, hinges – this actually took me more time than the actual painting.
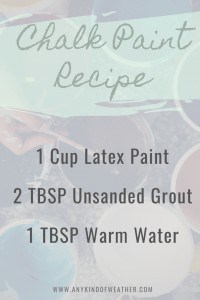
- Mix up your chalk paint solution with the recipe below. This is the key to painting anything in your house in a matter of minutes with only 1 or 2 coats. I’ve painted laminate furniture and it turns out fabulously. Note: You can also buy chalk paint, but this is super easy and very cheap.
- Use your paint roller to paint large areas of your furniture.
- Use your paint brush to paint legs and small areas you can’t reach with the roller.
- Allow furniture to dry completely. Cover remaining paint with plastic wrap. Once dry – apply a second coat where needed.
- You’re done! You have a beautiful new cabinet!
- Note: If this is a piece you want to protect from wear, consider adding a wax.
Supplies
Affiliate Links – As an Amazon Associate I earn from qualifying purchases.
- Screwdriver
- Paint – I used Hale Navy from Benjamin Moore. It’s a really nice nautical blue.
- Measuring Spoon & Cup (you won’t want to use these again for cooking)
- Plastic Stirring Spoon
- Cup for mixing your paint
- Unsanded Grout
- Warm water
- Purdy Paint Roller – I like to use the mini rollers on small projects.
- Purdy Paint Brush – I’ve used this paint brush for every room in my house. It’s amazing for painting trim too! The secret is in the short handle and angled brush.


10 Comments
Mama Bear Finance
THIS IS STUNNING! I love DIY and I want to do more of it with my daughter some day. Love the beautiful transformation of your cabinet!! Just, WOW!
Ariana Dagan
Great tips! It turned out amazing, and I LOVE the color you chose!
Charissa
What an awesome transformation! That Chalk paint makeover made such a HUGE difference! Great job!
vanessa
This is super cool! I love the way this turned out. I have been wanting to chalk paint our dinning room table. Thanks for the chalk paint recipe as well.
Beth
I love chalk paint DIY projects. I’m planning some for our new home. Thanks for sharing!
Heather
Your cabinet turned out great! Love the color! I never have done any DIY projects like that before, but it looks easy enough. Thanks for sharing the recipe for chalk paint too. I’ll have to see what kind of DIY project I can do around here!
ErinG
It’s really simple with the chalk paint. Once you try it you’ll be hooked!
Margeaux
Nice tut! The result is stunning! I hope I can try this one in the future. Thanks for sharing!
Dana
I love that nautical blue color. It is beautiful. Great job!
ErinG
Thanks Dana! I love that color too! I think I may do something else in that color soon!